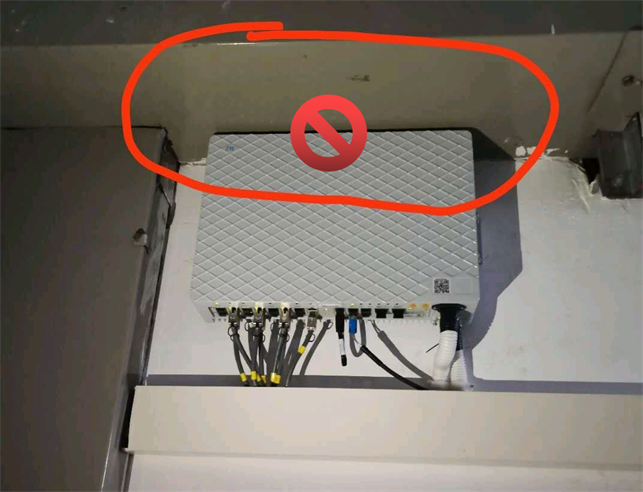

The pBridge (PB) is not waterproof. Thus, it is prohibited to install the pBridge (PB) in a wide scenario that is subject to rain, such as a courtyard, otherwise the equipment may be corroded by water and damaged permanently.

Waterproof bends must be made for Ethernet cables at the pBridge side to prevent rainwater or condensate water generated by the air conditioner from entering the PB; otherwise, the Ethernet interface of the equipment may be corroded by water and the equipment may be damaged permanently.

When the PB is installed on the wall, the interface of the PB must face downwards, cannot face other directions. Otherwise, water or dust may enter the Ethernet interface and cause the equipment to be damaged permanently.
It is prohibited to place the PB horizontally without being fixed tightly, otherwise, the PB may be damaged permanently due to being overheated.
It is strictly prohibited to install the PB directly under a heating element.
The equipment ID must be labeled clearly (for example, PB-1) and be the same as that in the design drawing, otherwise, it may cause maintenance failure.
The fiber connections of the PB must be the same as those specified in the design drawing; otherwise, it may cause commissioning failure due to inconsistency between the front end and back end.
Do not place any item on the PB equipments.
The PB must be installed with the grounding cable.
When a PB is installed on a wall or a pole, a space of more than 300 mm must be reserved at the top.

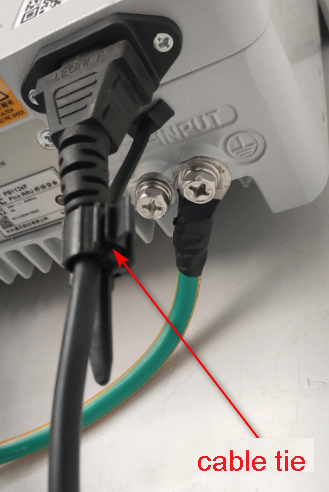
After the power cable is installed, you shall fasten it with the dedicated cable tie to prevent it from falling off.

To prevent burn injuries, power off the device and wait 10 to 15 minutes before removing the device.


Installing the PB With a Simple Installation Kit on the Wall
Install two flanges in the middle holes on both sides of the PB to ensure symmetry.
Ensure that the radiating fins face towards the wall and the smooth side faces outwards.
Ensure that the Ethernet interface faces downwards to avoid dust.
Installing the PB into a Cabinet
Install a fan subrack for heat dissipation.
Press the fan power cable with its rubber blocks into the space between two radiating fins.
Plug the fan power cable into the FANS interface of the PB.
The radiating fins should face downwards and the plain side should face upwards.
Ensure that there is no heating element directly under the PB. The PB must be at least 1U away from the element under it.
Ensure that the 19-inch standard cabinet has a space at least 2U high.
Ensure that the cabinet depth is at least 480 mm.
Install the flanges on the front of the interface board, and install the bracket on both sides of the PB through the middle holes as a holder.
Check whether there are supporting rails at the installation points. If there is no supporting rails, install the rails.
Installing the PB on a Centralized Mounting Bracket
A maximum of three PBs can be installed, that is, two PBs are inserted vertically while one PB is installed on the front side.
The interface must face downwards.
Ensure that the radiating fins face inwards and the smooth side faces outwards.
© ZTE Corporation All Rights Reserved